Hello ...is anybody still here? ...My goodness, it's been a long time since I was!
Kudos to all you bloggers out there who do this every day ...I don't know how you manage it ...you must have some secret that I don't that enables you to stretch the twenty four hours that each day consists of!
Again, I am intending to try and do this on a more regular basis.
I do post daily on Facebook and Instagram so there's no reason why I can't do it here as well is there ...other than having cotton wool for brains and always forgetting.
I have plans to rejig PurpleDreamDesign in the New Year so paying more attention to this blog will be included in those plans.
No pictures today or photographs of recent work ...this was me just popping in to let those of you know, who do follow this neglected blog, that I am still here and I will be getting my proverbial in gear to post more content for you and hopefully it will be interesting :-)
Deb x
Monday, 3 December 2018

Tuesday, 6 September 2016
Forgive Me Father....
Forgive me father for I
have sinned – it has been nearly two years (!) since I last blogged!
I cannot believe I have let
this blog become so neglected. I have no excuse for it other than I’ve been too
busy, too lazy, too disinterested or simply just all of the above.
Quite a bit has happened
since I was last here but because I don’t keep a journal, I can’t remember half
of it!
I will ease back into this
with a recent canvas project I created for a Design Team Guest Spot – yes, each
of those words deserves a capital letter because I was beyond chuffed to be
chosen!
Jac Desordre who runs Things To Alter put the word out on Facebook that she had guest spots on her design
team and I was accepted for a spot in August. Jac designs and cuts mdf shapes –
all manner of designs, shapes, sizes …she cuts to order too …if you have a
particular shape in mind and you can’t find it anywhere, get in touch with Jac.
The items are fantastic quality and the prices are so competitive too.

I had seen the lightbulb on
the website and decided to base my entry around that item following a
steampunk-ish, grunge-ish vibe. I didn’t really plan any further ahead than the
lightbulb, the design evolved as I went long – as most of my mixed media
projects do.

Even if I start with a plan, the
finished piece bears no resemblance to that original plan!

The mdf pieces are fabulous
to work with, they take ink, paint and embossing powder without any trouble at
all. They are lightweight and a nice depth, not too flimsy, not too bulky.

I am really pleased with
how this looks and as soon as I get some more canvases in, I will be placing an order with Things To Alter and I will be creating a
couple more in different colours.

Ingredients: canvas, mdf elements acrylic paint, embossing powder, matte medium, flatback gems/pearls,
patterned cardstock, distress ink, promarker pens, crackle glaze
Sunday, 12 October 2014
Autumnal Colour...
This project is for the Craft Stamper Challenge
The challenge this month is to create something using multi coloured stamping.
I wanted to stick to just
three colours of ink and to steer away from bright colours on this one, the colours I chose dictated the design. I wanted it to
be relevant to the time of year - my favourite season is autumn. I love the
colours and I was born in October so that may have a bearing on why I like this
season!
I didn’t have an exact
design in mind so just sort of went where it took me. I think I’ve ended up
with a sort of journal page sort of thing (?!) - mind you, even when I do plan out a
design - it never ends up the way it was planned in my head!
So my ‘ingredients’ were:
Tim Holtz Distress Stains, Peeled Paint, Mustard Seed, Vintage Photo for the multi coloured stamping. The stain gives a rather messy image rather than a precise one but I thought that worked well with the colours, sort of messy pile of leaves effect.
Archival Ink in Russet for
all the edges, added with a dry baby wipe
Sheena Douglas Christmas
Trees set of stamps, I used the branch, the tree and the fir cone
A diamond pattern
background stamp (a stamp I use all the time)
An A4 sheet of patterned
paper, it has a Christmasy flower pattern on it
Crown emulsion in Soft Cream and Hobbycraft acrylic in Parchment to tone down the pattern on the paper
A Letraset fine liner pen
in black for the wording
And this is what I’ve
created, it’s quite restrained and unembellished for me and more or less the
only technique I’ve used is the multi colour stamping.


I do enjoy the Craft
Stamper challenges, they are exactly that - a challenge! They help to get you
out of your safe place and try new techniques and designs - always a good
thing!
Wednesday, 24 September 2014
Turn Me Over Stamped Tissue Technique
This project is for the
Craft Stamper magazine challenge…the link is just over to the left.
The challenge this month is
for the technique of stamping onto tissue paper.
I have used tissue paper
before when wanting to get a design onto canvas but usually by printing my
image on it rather than stamping. I have a bit of a collection of different
stamps so I should really stamp rather than print more often - I’ve purchased
the magazine every month since I discovered it so I have all the free stamps to
choose from!
I have made a couple of necklaces
from Tim Holtz Grunge Board recently so decided to use the technique to create
another one of these necklaces. I wanted to create a double sided pendant that
was large enough to accommodate the stamps I had chosen without losing too much
of the design. A pendant that could be just switched around to reveal a new design on the other side.
The only circle die I have
is one of the XCut thin types and this would not cut through Grunge Board but I put
it through my Big Shot a couple of times so it would leave a guide line for me
to then cut the circle out with a craft knife - I wasn’t too bothered about it
being perfectly round at this stage (I could not cut a straight line with a
craft knife if my life depended on it, let alone a perfect circle)!
I painted it with white GeeSo
Good Gesso then a layer of Docrafts Acrylic Paint in Tea Pink. I used a makeup
sponge to dab some Docrafts Lavender Acrylic Paint through a Prima Marketing
Raindrop Stencil to create little splodges on each side. I then used a fine
liner pen in black to outline the little splodges.
The stamps I used are Stampers
Anonymous (title unknown) and Stampede ‘Dreaming of You’ - I stamped the images
onto Hobbycraft White Tissue Paper with Memento Tuxedo Black then I coloured
with Letraset Promarkers (Wild Cranberry, Pink Lobster, Winter Berry, Rock
Pool, Sandstone) on the reverse side of one of the images. I felt that the
splodgey bits of lavender paint on one side of the pendant were enough colour
for the other image.

Then it was just a case of
a layer of Mod Podge Gloss Lustre on the pendant, tear around the tissue paper
image to fit and lay it onto the pendant, add another coat of Mod Podge on top
to seal and leave to dry. Repeat with the other side.
To add more texture and
interest, I used a Star stamp that came free with an issue of Craft Stamper and
stamped randomly with a Versamark Watermark Stamp Pad, then embossed with Debbie
Moore Metal Magic Antique Gold Embossing Powder. I also used this powder on the
metal birds.
I mixed some of the Antique
Gold with some Heat It Up Black Embossing Powder and used this for the Recollections
Bird Cage and also the rim of the pendant. This is why I wasn’t too bothered
about cutting a perfect circle - I knew I was going to edge the pendant with
embossing powder. I added a small Prima Marketing Brad from the Engraver range to the top of the cage - with its ‘legs’ snipped off first, then added one of the birds to the
bottom of the cage. I added the two remaining birds to the other side. Docrafts Ultimate
Craft Glue in Clear was my adhesive of choice on this project.

This is quite a large
statement piece - it's four inches in diameter(!) so I kept the chain part fairly simple, just bronze coloured
chain, findings and some small dark pink beads.

The technique of stamping
onto tissue paper has almost endless possibilities in crafting - allowing you
to add your favourite stamp designs to almost anything. As well as cards,
canvas, boxes, mannequins, furniture, candles etc, it’s perfect for this type of jewellery
making.

I love that this is
reversible - just turn the necklace round and you’re wearing a brand new
design!
Watch this space for some
matching earrings and a cuff bracelet lol x
Friday, 19 September 2014
Jar Of Hearts
The theme for the Hels
Sheridan Sunday Stamper challenge this week is Music.
I don’t have any music
related stamps so I have chosen to theme this around a verse from a favourite
song…Jar of Hearts by Christina Perri.
I’ve used the lid from a
chocolate box (Thorntons Premium Collection…which were very de-lish, thank you
very much!) Black Gesso’d it, then painted it randomly with Docraft Artiste
Acrylic Paint in Perewinkle, Sage, Seaspray and Antique Gold Metallic. I used
the same paints on a piece of patterned paper which I tore to fit the inside of
the lid. I stamped a diamond pattern here and there on the background plus some
little hearts in a line, embossed with Heat It Up Embossing Powder in Baby Blue
and Seafoam White.
I stamped LOADS of hearts
of all different sizes and designs with a Versamark Watermark Ink Pad, then
heat embossed with the Baby Blue and Seafoam White. The hearts were then
coloured with Letraset Promarker Alcohol Pens in Denim Blue, Duck Egg,
Sandstone and Gold. They then had to be cut out – a job I personally loathe –
NEED a Scan’n’ Cut!!
I glued them to the paper randomly with PVA
then brushed Mod Podge Gloss Lustre over the whole lot. It gives it a sheen and
helps them to stay stuck down.
I used the Mod Podge to
glue three hearts inside the ‘jar’ – I used an empty spice jar. This was a
little bit tricky, I used cotton buds to wipe off the excess that got smeared
on the inside of the jar.
I painted the lid of the
jar with white Gesso, then the Sage and Antique Gold paint. I attached stamped
and embossed wings to another heart and glued this to the jar lid. I layered
some more hearts on the background paper with sticky pads to give some depth
and added some lace along the top of the box lid, and just inside the bottom, the
lace was coloured with the promarkers.
I then wrote out the verse
from the song freehand but also added some stamped letters in there too to mix
it up a bit. I cut the verse out into seperate lines and used sticky pads to
fix into place.

I quite like the way this
turned out but it’s not my best work lol. I wanted to keep it quite basic and I
think it’s the colours I chose that’s making me think it’s not all that plus
the fact that there are no flowers or butterflies – that was hard! I’m not used
to using these sort of colours so not only was a Sunday Stamper challenge, it was
also a challenge for myself - not to use any purple, flowers or butterflies!
Wednesday, 23 July 2014
Where Do You Go My Lovely...
The ‘My Lovely’ in question
is in fact my Mojo!
Since making the quickie
necklace (see previous post) that creative thing that I hear many people
calling their Mojo has up and done one.
Well actually if I am
honest, I could just be blaming him or her even for my complete lack of
enthusiasm and can’t be bothered attitude, both of which are firmly ensconced.
I have plenty I could be
doing, my step father’s birthday card for one, which is in a few days. I have
lots of projects all written and sketched out in my various ideas books, I have
absolutely loads and loads of ideas running around in my head. So I can’t
really say it’s the creative thought process that is eluding me – I’m just
being out and out lazy!
But what can you do when
you get like that – I keeping saying to myself, come on mrs, have a word with yourself,
get your backside into gear – but I’m just not listening.
So this afternoon, quite
late on I took myself upstairs, got sat down at my work space and said out loud
“come on, just do it”!
This is the result – there is
no rhyme or reason, doesn’t really make any sense (but then again, does it have
to?) but at least I have emerged from that craft room triumphant – I have made something!

The ‘face’ was already sat
there, I had used two different stamps and white embossing powder to create a
resist image for when I added the distress inks, but had not got any further
than that. Which is a shame because I had intended to enter whatever I ended up
making into the last Craft Stamper challenge. That didn’t happen because it was
abandoned when the lazy vibe took over and I realised I would not get it
finished in time.
I started with the face
this afternoon and literally just started adding torn papers, words, ink, embellishments
and more stamping. I didn’t really think about it, wasn’t that precise about
where things were placed and wasn’t that bothered if it ended up looking messy
(you can see the glue in some places)
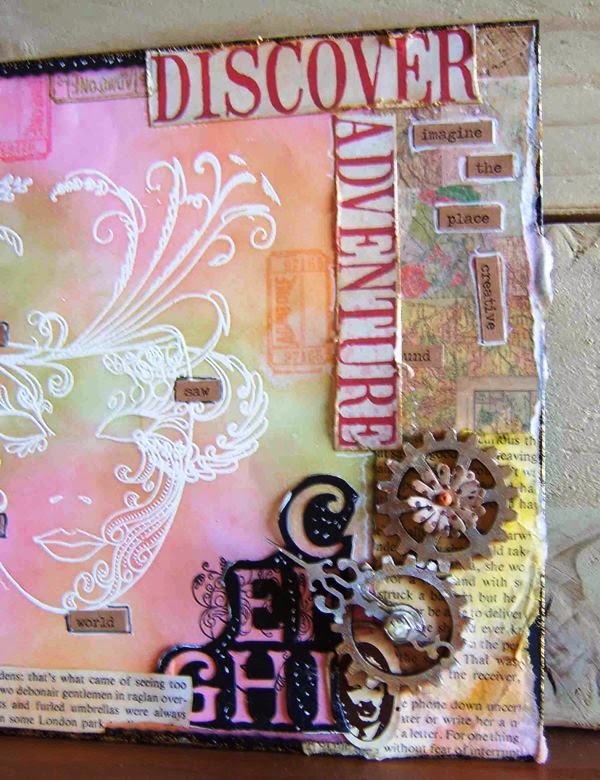


I am going away in a couple
of weeks so maybe that will reinvigorate me and when I get back I’ll be like a
maniac and it’ll be non-stop creating…
Wednesday, 16 July 2014
A Bit Of Grunge (Board)...
This quickie blog is about
a necklace I made recently.
A very nice lady that I
talk to on this here social media thingy, asked if I would share how I made it. I
have such lovely, funny conversations with her that I’m only too happy to share - I won't name her, she may not want the publicity lol ;-)
I needed a necklace for a
birthday do I was going to that evening and unbelievably, I had nothing that
was the right length for the top I was wearing.
So out came the Big Shot
and an hour or so later, I had me a necklace!
The first photograph shows
the ‘ingredients’ that I used. These are the items that I have in my ‘stash’
you could of course use anything that you have in yours. That’s the beauty of
crafting handmade pieces, it’s all open to your own interpretation.

Firstly, I got the O.H to
punch a hole in the centre of the two shapes and a hole in the top of one of
the petals of the base shape. I’m rubbish at that bit, I don’t seem to have the
strength in my hands to work the very naff hole puncher that I have.
A Crop A Dile is on my
‘Must Have’ list – which grows longer by the day!!
I used the Tim Holtz
Alterations Tattered Florals Die to cut Tim Holtz Idea-ology Basic Plain Grunge
Board into the flower shapes, I only used two of the shapes for this necklace.
You could use as many layers as you want.
I painted them with white
gesso (forgot to include the pot of gesso in the photo,
sorry) I
used Indigoblu GeeSo Good White Gesso but any other brand will do the same job
really.
I swiped Tim Holtz
Weathered Wood Distress Stain over the shapes, I put about three coats of stain
on, drying between the layers so I could get some intensity of colour in random
spots. I dabbed Wild Honey Distress Stain lightly on the edges of the petals. (I also used a light spray of Cosmic Shimmer Mica Spray in raspberry) I
stamped a bit of pattern with Black Soot Distress Ink using a Rubber Stampede
wooden stamp called Declaration of Intention on the base flower to add a bit of
interest. I stamped it randomly, I wasn’t bothered about lining it up or
anything – I just wanted a bit of pattern rather than the actual picture.
I pressed the top flower
layer into a Versamark Watermark Stamp Pad (which I’ve also not included in the photo - useless!) covered
it with Stamps Away Ultra Thick Embossing Enamel (Utee) heat set it and then
repeated with a second layer. I then repeated again for a third layer but
before I heat set it, I inked up the swirly part of the Inkadinkado wooden Happy
Birthday stamp with Dew Drop Brilliance Galaxy Gold Ink. You need to get this
bit ready to go as soon as you melt the third layer so you can move quickly and
stamp into the melted enamel before it starts to set. This will give you an
embossed pattern from the stamp. Press the stamp into the molton enamel for
about 20 seconds, lift off carefully and you should have a nice
impression from the stamp with whichever colour ink you have used.
The enamel works as a kind
of seal on the grunge board, a kind of protective layer, stiffening it at the
same time. I didn’t bother using the Utee on the base flower as most of it
isn’t on show anyway.
Join the two layers
together with a brad of some sort, I chose a pearl type one in a co-ordinating
colour. I’ve got some lovely vintage themed ones with clock dials, keys, script
etc on them so I’m going to use those on the next couple of necklaces that I
make. I fully intend to make some more of these – I can see them becoming quite
addictive!
I finished the pendant off
with a simple bronze coloured chain and teal green bead.
I felt that this was all it
needed but you could use leather or suede thong, some lovely ribbon or a beaded
chain, depending on what style you are after. You don’t have to stick with a
floral them either, lots of other shapes would work too. How about a lovely tweety bird or a birdcage, a birdhouse, a heart, an owl, a fox ? – you can get dies in any of these shapes
or you could even try to cut your chosen shape by hand – good luck with that
lol !
I was inspired by a
tutorial by Ellen Schrik in the August issue of Craft Stamper magazine. I had
been flicking through the magazine that morning and had read a tutorial on
making a pendant using Utee. So when I began looking through my necklaces for
that evening and couldn’t find one that I was happy with, I remembered the
tutorial and thought haha! - that technique will be perfect for a bit of grunge
board. The pendant in the tutorial was made out of card but the finished result
with the g.b works just as well and I think may be a little bit sturdier (?)
So that’s how I did it –
nice and simple and I hope it inspires you to create your own unique piece!

Tuesday, 17 June 2014
Oh The Pressure...
Today I’m sharing a recent
order that I managed to design and complete in 5 days.
The customer had mentioned
at least two months previously that she would like me to design and create a
wedding card. I gave her my contact details but then didn’t hear from her so
presumed she had changed her mind.
When I did catch up with
her and asked her about it, she said she had totally forgotten to send me the
details of what she wanted but could I still do it – for the following week!
“Of course” I said, “no problem” I said!
Now ordinarily that time
scale would not be a problem for a ‘normal’ wedding card but this was no normal
wedding card - the remit: “Alice in
Wonderland, red, white and blue, make my card stand out above all the others
and make it big” !
“Er…ok, any other
instructions”?
“No, just go for it, oh and
the bride has got blue hair and the groom’s hair is silver”
Well they sound like my
kinda people!
So the photos you see here
are the result of that conversation and I did manage to complete this in 5 days
so the customer could collect it in plenty of time before the wedding.
(the last pic is the box lid)


The customer is the bride’s mother so the pressure was really on, not just to finish it in time but to get it right. She absolutely loved it -
I’m not sure what I would have done if she hadn’t!
I’m not sure that I would
want to do this again though. I’m happy to take on last minute orders for cards
or anything else. I have done many times but they’ve been orders for quite
basic A5 size cards. This one really did put me under the spotlight (and it was
very hot under there) it didn’t go
completely smoothly and there were a couple of false starts and do overs. This
has taught me I don’t function well under the whip!
I’ve yet to catch up with
the customer to find out if the bride and groom did indeed like the card and if
it filled the brief so I’ll have to report back on that at a later date.
(this was a completely
unique card just for them so in respect to that there’s no tutorial)
Thursday, 22 May 2014
From This To This......
I don’t think I’ll ever
stop being amazed at how you can turn a white piece of card or a blank surface
into something completely different, just by using paint and ink and a few
embellishments.
This piece started off as a
blank wooden frame around a small mirror – one of two that I purchased at a
local car boot sale…never underestimate just how useful these places can be for
crafters and artists!
I was inspired by two
things when starting this project – Kay from IndigoBlu and the free Bird Stamp
that came with the June issue of Craft Stamper magazine. Kay did a mirror with
a seaside theme on the Create & Craft TV programme, it was really lovely so
I was inspired to pull one of the mirrors from the ‘to do’ pile and make my
version of it. The Bird Stamp made me think of a garden floral type theme so
that’s where I headed.
Now, as is usual for me, I
forgot to take photographs as I went along. I started out well with the first three pics.....


then got so in-grossed each time I worked on it that the photo thing
went out of the window - that reminder note I’ve pinned above where I sit is sooo
not working!
So with this one you’ve got
more of a written explanation rather than a visual one.
I gave the frame a coat of Black Gesso then some Acrylics in different blues, then I painted a 12x12 piece of Patterned Paper with Acrylic then cut it to size and cut the aperture from the middle to fit the mirror. I
roughened and distressed the edges with a Scissor Blade. I used Texture Paste
through a Branch Stencil then painted over it in toning colours and added some
pink and gold for the ‘blossom’. I then randomly stamped Flowers, Birds,
Foliage and Dragonflies in Black Ink without really taking too much care where
I stamped. I also stamped circles using a Plastic Spray Bottle Top and gold grid
lines using a Plastic Loyalty Card. I randomly added Metal Effect Embossing Powder
and there’s a bit of pink Gilding Wax in some areas too.
The Butterflies were
stamped onto Tissue Paper then coloured with a Promarker, then ModPodged onto
the frame, then a bit of doodling with a White Gel Pen. The bird was stamped onto
White Card, coloured with Distress Ink and given a layer of Glossy Accents. The
Bird Cage is a Recollections Die Cut, which I painted and embossed and gilded,
adding a little Brad to the top.
I painted the paper flowers
with White Gesso and then Luminarte H2os, using them to embellish around the
aperture along with a bit of Lace and some turquoise Gems thrown in for good
measure!
I wanted this to be quite
restrained and distressed so I tried really hard not to be neat and tidy and
not to over embellish. When it was nearly finished I wasn’t really that happy
with it – I felt it was too dull, that it didn’t ‘pop’ enough. I think that’s
down to the colour palette I’ve used so I just continued with it to see how it
ended up rather than adding it to the abandoned pile – I’m sharing because I’m
really quite pleased with the way it turned out.


Onwards now to the next
little project…a handmade colouring book birthday gift for a little girl who’s
got a thing for colouring and drawing and who just loves pencils and paper…she sounds
perfectly normal to me!
Monday, 21 April 2014
Powered By The Light
My entry into the Craft Stamper Challenge... the link to Craft Stamper is just over on the left.
I have only entered two
challenges before, both for the talented Hels Sheridan’s Sunday Stamper. Those
challenges are based on a name being randomly drawn, not on the design you have
entered but the Craft Stamper challenge is all about the design. This will be
the first time I have entered a challenge like this and it was really hard not
to ‘over think’ the whole project! I don’t expect to win and I am entering as
more of a challenge to myself really. I’ve done it to see if I could finish a
piece of work to an absolute deadline without totally obsessing about it and
giving up half way through because in my head it just wasn’t going to be good
enough - so I just went for it.
The remit was altered
bottles/vials and of course stamping.
So this project evolved
from the thought “I am powered by the light” – as we all are. We cannot live
without it, be it natural or artificial.
I started with a white
canvas which I turned over so it became a frame and painted the inside edge
with a mix of blue, green and yellow acrylic paint.

I then created some light
bulb patterned paper digitally and lined the inside of the canvas and the frame
edges.

I used some bubble wrap to
stamp patterns over the light bulb paper and then used the free bottle stamp
from the May issue of Craft Stamper to stamp around the edge and the inside. I
also stamped this image several times on card, embossed with white and crystal
embossing powders and cut them out.
I mixed some acrylic paint
with texture paste and spread this into two of the corners – I don’t have a
spatula, spready thing so I use an old plastic membership card, it does the job
just as well! Lace was added top and bottom then I added gilding wax to the
ridges of the texture paste.


I resized and printed out an image of a light bulb and stamped a decorative face onto it and embossed this with black embossing powder. (I found this stamp in a charity shop so I don’t know where it is from) I white gessoed the background and edges to tone it down a bit.

I printed the light bulb
pattern onto tissue paper and applied this to the inside of two of the little box
lids and also to the outside of three of the vials. I stamped the bottles onto
tissue paper and applied these to the inside of the two more of the box lids. I
fixed the tiny vial into the round box lid with some patterned tissue behind
it.

I stamped the pattern around the edge of the
light bulb and randomly over the canvas using the hair part of the face stamp.
I then arranged the box
lids on top of the face and embellished the canvas with paper flowers, leather
leaves, brads, hinges, bead filled bottle caps, split rings, corners and gems. I also used gilding wax
on all the edges of the canvas and on the embellishments and the stamped bottle cutouts.
Finally finishing off with
the wording “I am powered by the light”

By the way, this is also
the first time I have actually written down how I have created a project so my
apologies if I have not explained this very well!
Saturday, 12 April 2014
Forgetfulness - A sign of genious?
Forgetful – adjective: apt
to forget, absent minded – in other words…the mind is absent!
At least I feel like mine
is. I cannot seem to retain things in my brain that I am supposed to remember.
Especially things that I am supposed to actually do.
Walking into another room
in the house to do something or get something and promptly forgetting it as
soon as I’ve walked through the door is a regular occurrence. I end up just standing in the doorway for ages, trying to prompt myself to remember what it was. Inevitably, it doesn't come to me, I have a swear, then leave the room.
Is it age? I am on the
wrong side of middle age after all so maybe that’s it. Or is just part of our
genetics, because I know I’m not the only one who has this problem and not all
of these people I know are ‘mature’.
This lack of ability to remember
things has resulted in my becoming an endless list maker. I have not gotten to the
stage of making lists to remember I’ve made a list but I don’t think that’s far
off. Piles of paper scraps litter the
house. Lists for shopping, lists for house chores, lists with meal plans for
the week, lists of projects and orders to do and to finish, lists of where I am
supposed to be that week - the list is endless...(sorry couldn’t resist that one)
Tired of having to gather
up all these bits of paper every so often to get them in the recycling, I tried
to compile my lists on the computer, all typed in with headings and columns and
everything – that didn’t work – I forgot to look at them!
The latest canvas project I’ve
just finished has reminded me of how bad I am. I really did mean to take
photographs of this work as it progressed from start to finish but before I had
even finished that first coat of paint, I had forgotten what I had reminded
myself to do. There’s no hope for me is there?
I have now resorted to
sticking a piece of paper on the shelf edge above where I work, which says… “Rememeber
to take the photos you forgetful old bat”
I just need to remember to
look at it!

Monday, 7 April 2014
Vintage Nirvana
Newark Auto Jumble - the
title leads you to believe that it’s a jumble sale of vehicle related stuff and
indeed it is – but it is also the home of all manner of treasures and finds
that belong to yesteryear.
Amongst all the exhausts,
engines, nuts, bolts, and tyres there are quite a few hidden gems if you look
close enough.
As you can see from my
pics, you can find anything here from old computers to cash registers as well
as the odd eccentric!


You usually have to elbow some
flat capped old boy out the way first mind, they like to hover and lean over
the stalls poking everything with their walking sticks whilst muttering “aye
lad, I had mesen one a those when I were a lad, tha knows”

Now, an auto jumble is not
usually up there on my want to do list on a Sunday but the o.h asked me to go
with him – and yes, I know the reason why – a second pair of hands comes in
very handy to carry your spoils whilst you’re busy perusing what other stuff
you can’t possible live without.
Anyway, I didn’t mind too
much, there was plenty for me to look at by way of all the lovely cars that
were lined up.


I love old cars, so much
individuality and character. They put our modern day boxes on wheels to shame.
When I was about 4 or 5 years old, we had a Hillman Imp, I don’t know how a
family of 4 managed to squeeze into that little toy car! Then later, when I was
about 7 or 8, my father bought a Rover 3.5, oh we thought we were sooo the bees
knees riding about in that!


Me and the o.h would love
to own a classic car but with the mileage he has to do for work, alas, it is
not practical.


We may have to wait until he retires but we will own one
eventually – we’ve just got to choose which one. There’s so many I love, we may
just have to pick a name out of the hat!
Subscribe to:
Posts (Atom)